paper suitcases from t-shirt boxes
June 27, 2012 § 35 Comments
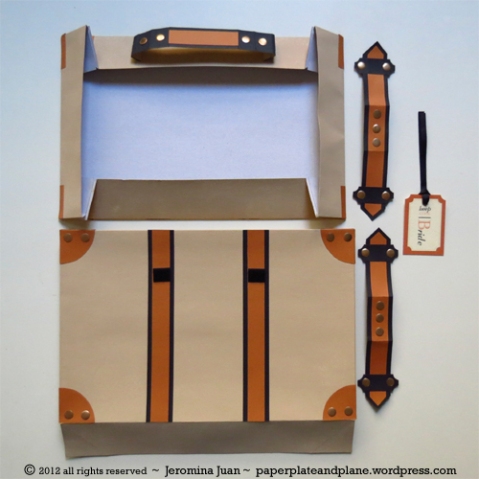
Hours and hours flew by as I made our wedding favor boxes: paper luggage.
At first I thought: it’s just a t-shirt box and I only need to repeat the process a dozen times, it’ll be a cinch. I didn’t consider the hours alone on painting each side of the t-shirt box into our wedding colors. Nor the time to contemplate and execute the paper details like the corners, straps, handles, and Velcro enclosures.
What was most important is these need to be compact. These suitcases will be traveling from Toronto to New York to Las Vegas afterall and, well, they have to fit in our big suitcase before they are given away to our guests and vendors the morning of the wedding. So I made sure to maintain the ability to fold and unfold these in the same way they came when they were t-shirt boxes, but also have the ability to attach and detach items that easily convert them into luggage.
We’ve called them our “Keep Cool” kits, as they will contain relief from the Vegas and Grand Canyon heat.
Tutorial to follow after the wedding! Keep posted!
suede-boxed invites with hand-marbled papers and terracotta succulents
June 4, 2012 § 5 Comments
I didn’t think this would be so hard! Especially after designing handmade stationery for over 150 weddings in my designer days. I discovered, amidst the arduous task of making my own invitations, that it is a million times easier to design for someone else!
The problem was I wanted to design in every style possible. In one brainstorm, I’d want classic and sophisticated. The next, I’d want graphic and whimsical. Then after more thought, I’d want minimal. It was a harrowing process to narrow down to one decision only. I’m not used to this! Clients did all this decision-making for me! But for our own invitations, I felt like I could’ve made a hundred different versions to satisfy my fickle fancies.
It was a challenge to clear my mind of all the invitations I’ve made in the past. One thing is for sure: wedding invitations are about tactility. The product is entirely about texture and touch. So how could I make something classic, sophisticated, graphic, whimsical, and minimalist at the same time? Well, I tried. Really tried. And it hit me: all of my fickle fancies could be relevant and cohesive.
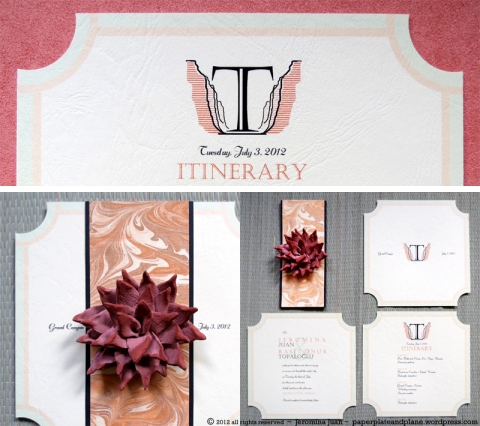
For a classic style: a square shape with concave corners. The invites are printed on my favorite stock of all time — leather-textured paper, which reminds me of old books.
For an air of sophistication, the inserts are carried in a handmade micro-suede box (color blocked in apricot and camel), with personalized dust sleeve made of the same leather-textured paper used for the inserts.
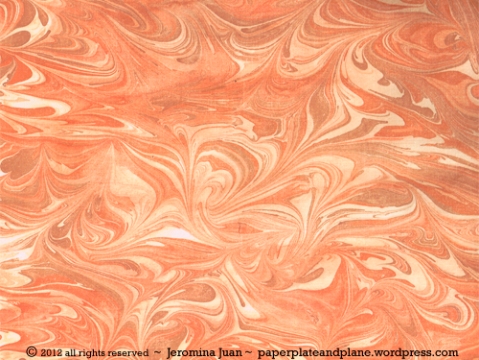
For something bold and graphic, I knew ebru, the Turkish art of paper marbling, would be relevant by today’s trends and significant by O.T.’s culture (apart from conveniently resembling the Grand Canyon walls). He was really impressed that I went so far as to learn how to make my own marbled papers. He would like to take credit as supervisor of this process.
For a bit of whimsy, I sculpted succulents out of terracotta clay to complement our earthy desert venue. I mentioned in a previous post that terracotta will have a significant part at our wedding and the invites provide this sneak peek.
For the minimalist architect grad in me: a monogram of our future family initial with a simplified and very architectural hatched illustration of the Grand Canyon. O.T. and I heavily considered helicopter silhouettes, but later decided the oversize “T” emulated helicopter rotors reaching to the bottom of the canyon, in a very implicit way.
This whole project was an ordeal, more time consuming than I expected.
The boxes took the longest time to make. I cut and glued millboard before covering the surface with the micro-suede material I showed in my previous post, and affixed a monogrammed transparency as a window.
The terracotta succulents took a long time to dry (3 weeks) and they still don’t look entirely dry, but I am quite liking the darkened tips. I will post a tutorial on how I made the terracotta succulents next.
The ebru marbled papers were the quickest to make (without considering the hours upon hours of researching how ebru is done). I was at odds about the marbled papers for two reasons. They can be bought online, but it was really important for me to make our own in the colors and patterns that unify the project. The materials to make ebru are pricey, so there was a point where making ebru was difficult to justify.
I found sites recommending shaving cream. I tried. What an awfully imprecise way to make marbled paper! Then there are sites which recommend methyl cellulose (very pricey considering I could only find it online and shipping fees to Canada are enormous). But I wasn’t going to give up.
I happened upon this amazing blog, Knit One Quilt Too, on easy paper marbling using liquid starch. It was decided. I will embark on the adventures of my own hand-marbled papers. And for super cheap! Sta Flo Liquid Starch sells for $2.97 at Walmart!
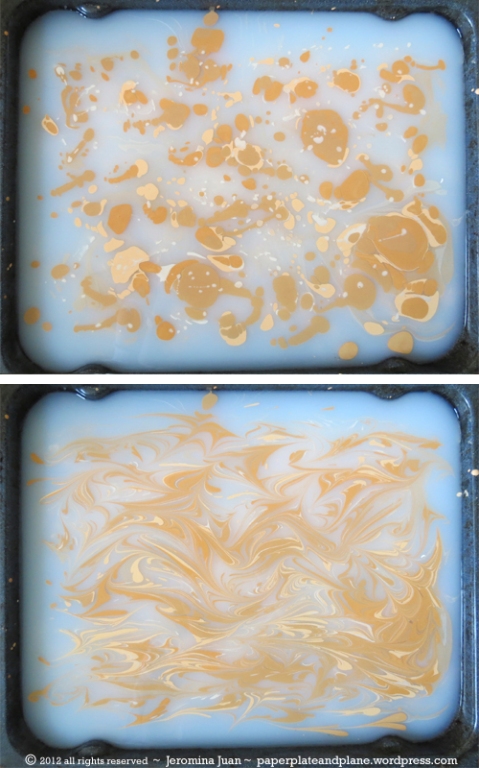
It was a painless process. I placed half a jug of liquid starch in a shallow tray. Then I gently drizzled watered-down acrylics on the surface of the starch. And marbled away using a bamboo skewer. I carefully dipped my paper on the surface of the marbled starch and immersed it in a water bath for a few seconds to rinse the starch, then laid the paper flat to dry. I was impressed with the level of control the liquid starch provided and couldn’t be happier with my first paper marbling experience.
Insane, these invitations made me. And I only had to make four! I have never put so much thought and time into invitations for anyone else, nor will I ever. I am pretty happy with the results!
canadian living may 2012 issue: mother’s day topiary
April 13, 2012 § 3 Comments
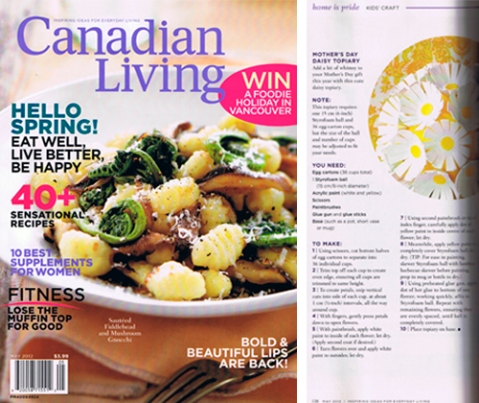
Ok, my April issue unveiling may have been a little late. But the Canadian Living May issue just came out last week with my latest contribution:
 There is still time to head out to the newsstands to pick up a copy so you can make this daisy topiary from egg cartons for Mother’s Day or simply for spring! I will update with the link when the article is available online.
canadian living february 2012 issue: valentine candy heart boxes
January 9, 2012 § 8 Comments
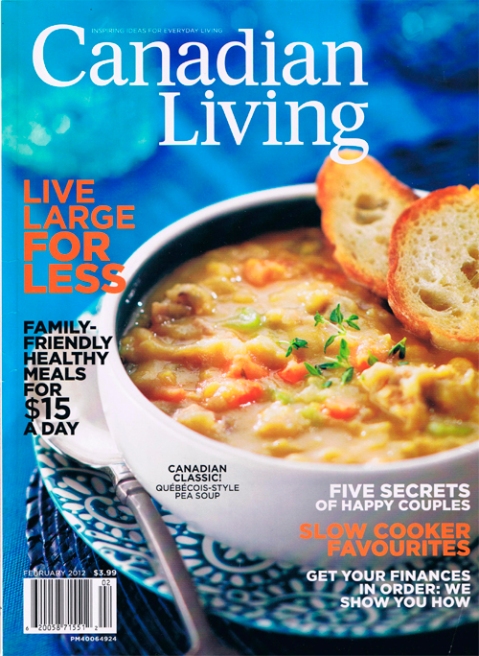
On Friday, as my co-workers and I spent our lunch hour wandering the aisles of a nearby Walmart, I spotted the February issue of Canadian Living Magazine already out on newsstands!
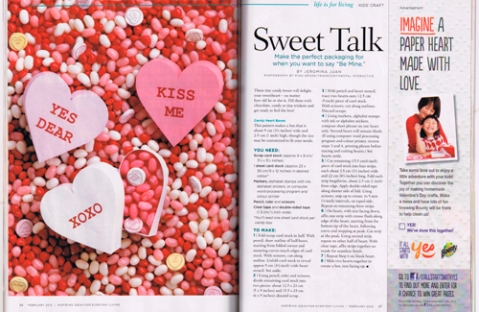
I did my rounds of grocery shopping on Saturday and, indeed, the issue is available everywhere magazines are sold in Canada. So if you’re in Canada, please head over to your closest newsstands to pick up a copy and turn to pages 66-67. For those of you beyond our Canadian borders, you can find the article at canadianliving.com. (I will update once the craft is available for viewing online).
Here it is! Treat boxes in the likeness of candy hearts for you to make for your sweetheart this Valentine’s!
Am I giddy! My first print publication. Well, my “first”, unless considered are my monthly column for our local Parish newspaper at the age of 13 and my dreadful illustrations in the high school newspaper, but they simply won’t (shan’t) count. So yes, this is my first print publication. Ever. And of the year. I am so blessed. I didn’t imagine when I started this blog not so long ago that my first print publication would be a two-page spread in a national magazine.
I cannot wait to share with you other publications to follow in 2012 (and, praying for a bit of luck, beyond). I could not have more gratitude for the opportunities being given. Thank you!
paper sleeves and monograms for plastic containers
December 19, 2011 § 4 Comments
Despite all the fancy packaging choices at stores, giving away your holiday home-baked goods in plastic containers isn’t necessarily such a tacky thing (given the right accessory!).
With your favorite heavy stock cut and folded into a sleeve, your ordinary disposable plastic container is easily dressed as a pretty little package for giving away anytime, not just Christmas. Punch out a monogram and make it more personal!
I first designed sleeves like these for Christmas favors way back in 2003. That was the time I realized store-bought holiday tins and boxes (though printed and pretty) are three things: 1) lacking in personal touch; 2) pricey (if considering volume gift-giving); and 3) not exactly what I want. Since then, and every year, I looked forward to making treats packaged in my own custom (most importantly: cost-effective!) designs which I gave away to family and friends in lieu of a Christmas card. This style is most personal to me, out of all annual packages I’ve designed in the last 8 years because this is the project that inspired my need for custom Christmas packaging going forward. It also happens to be the simplest. Overtime on this blog, I would love to share with you each and every one of my past annual custom packages given to my family and friends and co-workers, however, I will start from the very beginning with this simple piece from 2003.
My “Kuya” (“Big Brother” in Filipino) thoughtfully kept and preserved the original package I gave him (down to the bits of brownie stuck on the inside lid of the container — eeew!). Seeing it after eight years is what inspired me to post this project on this blog. But for the blog, I wanted to change it up to show some patterns I currently love: plaid, cane, and herringbone.
Of course, it would be a long search to find the exact blue shades of plaid, cane, and herringbone cardstock to match the containers, so I opted out of that challenge. Instead, I quickly designed my own plaid, cane, and herringbone paper using none other than Microsoft Word (a hack job I often do…which leads me to the thought that perhaps one day in the coming year, I will have a little blog instruction on how to easily utilize MS Word as a design tool, if you do not want to spend the big bucks on Adobe’s sophisticated offerings).
You will need to measure your plastic container and cut and fold your stock accordingly. I suggest a container no larger than 4″ in diameter, such as the ones I used, otherwise you will encounter the impossibility of fitting 12″ cardstock around it.
To remedy any gaps (due to lack of length of paper), overlap a tiny strip with a greeting for an added touch.
paper clip christmas cards
December 15, 2011 § 27 Comments
So I thought (we all thought) my paper clip Christmas crafts were done with. But I realized I hadn’t crafted a single Christmas card for the blog this season. Gasp! Is Christmas ten days away?
Given my recent posts, paper clips were right here within reach and this was just too easy. I happen to have a huge tub of colored paper clips with perfect shades for Christmas shapes.
These cards can be easily crafted by little hands. Just dab the paper clips on some glue and design away.
eyeball paper packages
October 30, 2011 § 9 Comments
Ahh, I can’t believe Halloween is a couple of short hours away. I haven’t been holding out on you, I promise! I had some more ideas I wanted to test out and make and share here this month, but there simply weren’t enough hours in the day!
As mentioned in my last post, I spent the previous weekend brainstorming and carving pumpkins for the show on Tuesday morning which turned out to be such an amazing experience. I have plenty to say about what happened on Tuesday and I also have the video clips to post, but will do so in a separate post. After that, I caught my breath on Wednesday night. Come Thursday, O.T. was speaking at a conference in the east coast in Albany, NY, called me after work, and surprised me with “I’m taking the Greyhound from Albany, meet me at the station at 6:30 am”. Immediately after hanging up the phone, I attempted to embark on a cleaning frenzy, with no success (again, not enough hours in the day). In any case, my spectacular week couldn’t’ve gotten better! So he’s been here for several days and will be here until Wednesday.
As for the past couple of days, being Halloween weekend, the days are prime calendar real estate (after Christmas and Thanksgiving, of course). We had a couple of parties to attend this weekend and everything went by in a blink!
As for things that blink — I did have time to make these eyeball paper packages for the office tomorrow. 420 mini chocolates in 60 eyeballs in 2 hours. I wish I had shared this sooner, but I actually JUST came up with the idea today. One of the rare occasions when I’m glad I waited til the last minute. Otherwise, I would’ve simply reused my old ideas and would’ve felt a bit of self-reproach for not coming up with anything else different. I’m quite happy with the efficiency of these packages, considering how laborious most of my previous treat packages have been.
I have a 13″ x 19″ format color printer, and have stacks of 11″ x 17″ paper which I used. My very hastily made design (which you may download here for blue, here for brown, here for green) is intended to be 11″ x 11″. One eyeball paper package fits 7 pieces of mini chocolates. Simply fill with treats, gather, and twist. Yes, how handy that the excess twists into the optic nerve!
I’m sure you haven’t left your Halloween treats for last minute as I have, so perhaps this is an idea to consider for next year!
Happy Halloween!
fall and halloween d-i-y ideas
September 29, 2011 § 2 Comments
I cannot wait to work on fall and Halloween crafts for October, but before I do, here’s a recap of the fall and Halloween ideas I designed last year. If you didn’t get a chance to make any of these creations last year, I hope you try them out this season!
My most favorite post was the one with the Halloween balloon body parts. Doodle on balloons to create creepy eyes, bloody brains, and witch’s fingers:
Make cute little phantom place cards by drawing faces on pumpkin seeds:
Cut out and fold an itsy bitsy spider treat box with the very first printable I designed and shared on this blog (and it was my very first tutorial ever):
Grab a tupperware bowl, four corks, scraps of paper, a pen, and some raffia and create this witch’s candy-filled cauldron with broomstick:
You know I love me my packaging, so here’s another printable! Fill this harvest corn treat box with…you guessed it…candy corn! (I think this is still my favorite treat box out of all treat boxes I’ve designed for this blog to date):
Your little ones can make art of autumn grains with this wheat and corn décor made of exactly that: wheat (pasta) and corn:
And the most popular fall tutorial I made last year was the carved butternut squash centerpieces:
Oh, and I almost forgot: I did a whole week of pumpkin experimental recipes last year:
My favorite from pumpkin week was the pumpkin panna cotta:
And, I almost forgot, I designed and baked a ginormous woven cornucopia cracker for Thanksgiving:
Enjoy! More fall and Halloween ideas from me coming up in October! And I have a birthday GIVEAWAY coming to you this weekend! paper, plate, and plane is very soon turning 1. And I am very soon turning 1 year older. I am excited to host a special giveaway to celebrate the occasion(s). Stay tuned!!! 😀
cupcake liner necklace
September 24, 2011 § 3 Comments
What can you do with a few cupcake liners and a couple feet of brass chain from the hardware store? Why, make a necklace, of course!
This super easy, inexpensive, and surprising D-I-Y fashion craft is one I wanted to post over the summer before I got sidetracked by summer. But it’s not too late! So long as it’s not a rainy fall day, there is still lots of sunshine to be flaunting this fun, feminine, flirty necklace!
Yes! It is what I wore in my D-I-Y engagement photos in August. I wore it then with two flowers and wish now, in hindsight, that I wore three.
You will need cupcake liners (waxed is best), brass chain in your preferred length (they are typically around 45 cents per foot; for this project I used exactly 4 feet and paid $1.80), scissors, and ribbon.
 1. Trim off about 1/8″ of one cupcake liner.
2. For each cupcake liner, trim off an additional 1/8″ than the previous size. You will have cupcake liners that descend in size. I suggest 5 for large flowers; smaller flowers can be made with 3 or 4 cupcake liners.
3. Stack all cupcake liners and align so that they are centered. Fold the stack in half, with all cupcake liners facing out. Cut two very small slits, about 1/2″ apart, ensuring the slits are just wide enough to carefully slide the chain through. Large cuts will cause the flowers to loosely slide along the chain.
4. Carefully slide the chain through one slit of each cupcake liner, starting from largest to smallest. It is best to keep the cupcake liners 1/2″ to 1″ apart at this stage.
5. Slide the chain through the second slit of each cupcake liner, similar to sewing a two-holed button. Gather the cupcake liners to form a stack.
6. Fold the stack in half.
7. Pinch and fold towards the center.
8. Unfold to reveal a flower.
9. Layer as many flowers and chains as you please.
10. Thread a ribbon through the ends of the chain.
11. Tie a bow to close the chain(s).
Flaunt it. Feel fun, feminine, and flirty!
D-I-Y engagement photos: part 2 of 3 — napa valley, california
August 6, 2011 § 8 Comments
Here’s the second installment of our self-taken engagement photos, this time in the verdant vineyards of Napa Valley!
Just like the first set of photos, these were taken with a camera on a tripod and softened with a heavy dose of photo editing, all of which I will explain with more depth in the next and final post of this three-part series.
If you missed the first set, please have a lookie here for part 1. I admit I am a lot partial to that previous set now that the pictures are up for comparison. They express much more dramatic flair than this set, what with the tall brown grass on the knolls of Ed Levin Park, and the wind blowing through my curled hair and chiffon dress. The sheer effort of hiking up hills in a dress as my curls fought for their survival is, in my mind, the clearer winner. However, O.T. is not fond of days when I actually make an effort (a lot of it) to look made-up. This seems to be true for most men. They prefer women in jeans, hair undone, without the slightest trace of powder, and maybe just a smidge of lip gloss. So, these here pictures — a version more plain and less panache — are for O.T.
Though both sets of pictures display props I’ve made to highlight our long distance love, I do favor these airplane props in this set over the red tin can telephones in the previous. For one thing, as most of you have already read, our fateful love story began at an airport and in an airplane. Secondly, I used the logo I designed for this blog (with a few changes in theme). Third, I wanted to make use of paper, I am obsessed with paper afterall.
We went into Napa without a single plan of what to see. Neither being wine drinkers (a cardinal sin in Napa), we knew we were visiting to take pictures. From downtown Napa, we drove up and down the Silverado Trail searching for the perfect spot. There are plenty of beautiful spots, though not what we were seeking. Most vineyards are fenced in and close at four o’clock in the afternoon.
We diverted out of the Silverado Trail and headed southwest to Carneros and discovered a beautiful spot right at the entrance of Cuvaison Estates. We had gotten there well past 6 pm. Despite the gates being closed, we were able to walk through rows of unfenced vineyards to take our shots. The gates were far from the main road, so we drove further in to discover a pond waiting to be photographed.
Other cars had driven in, one driver paused a while to watch us take our pictures as we made our poses in front of the camera and tripod. He waited around after we finished one set (we were doing pictures in threes) and gave us the thumbs up from his seat. He drove past us on his way out, rolled down the window, and asked if we needed his help taking the pictures. We thanked him for his thoughtful offer but happily explained that we had undertaken the exercise to conduct our own engagement session. He smiled, puzzled, and disappeared past the vines.
I hope you enjoy the pictures as much as we enjoyed taking them! Feel free to click on each set for a larger resolution. Up next: D-I-Y engagement photos part 3 of 3: beyond the camera and tripod. Stay tuned!
rolled paper ice cream
July 16, 2011 § 7 Comments
Has it really been over a week since I last crafted? Our summer in Toronto has been Tremendous and who wants to offend the sun by staying indoors?! When I started the full-time job in March, I would scramble home to make sure I could craft before sunset. I absolutely refuse to take pictures at night (I’m sure you can tell which crafts were made at night from their poor pictures) and I have yet to build a “studio” or light box of sorts where I can take pictures under artificial light. I was under the assumption that come warm weather, I would have extended hours, as late as 9 pm, to craft and take pictures with natural light pouring through the windows. Right. Of course. Well that theory is out the window! Extended hours so my crafts could see sunlight? How about me and my very vital human need for some Vitamin D? Yes, that’s where I have been — scarce and out of doors and making up the weight I lose in sweat by gorging on an equal (or greater) weight in summer treats. How has your summer been? By no way is this question an affront to those in the opposite hemisphere undergoing the opposite. It’s just that our summer has been gorgeous.
Speaking of gorging on summer treats, here’s one that is guilt-free. I’ve wanted to make these rolled paper ice creams since I rolled paper ornaments for Christmas. In fact, I’ve had planned for a long time now to make rolled paper everything. We’ll get to that later (if ever!…or at least not during these summer days). For now, rolled paper ice cream!
You will need construction paper, double-sided tape, mounting tape, and 1/8″ red ribbon.
1. Cut construction paper lengthwise (9″ long) in 1/4″ increments starting from 3″ wide down to 1″ wide (e.g. 3″, 2-3/4″, 2-1/2:, 2-1/4″ and so on until 1″). Take the widest piece (3″) and adhere mounting tape across the center. Take 8″ of ribbon, fold, and place on the mounting tape.
2. Roll.
3. Take the second widest piece and adhere mounting tape across the center.
4. Center the strip on the previously rolled strip and roll.
5. Repeat, going from widest, until you’ve rolled the 2″ piece.
6. Adhere mounting tape on the bottom.
7. Take a brown sheet of construction paper. Cut into an 11″ circle. Cut circle into quarters.
8. Take one quarter and place double-sided tape on one of the edges.
9. Roll on top of the mounting tape to make a cone. Peel off the double-sided tape and affix.
10. Continue steps 2-5, by rolling the remaining strips (except the narrowest strip).to form the ball shape of the ice cream,
11. When you get to the narrowest strip, place the mounting tape directly on the center and cut it about 3/4″ from where you began. Place double sided tape where the seams will meet. This will ensure the final seam is flat, and not raised.
12. Roll the final piece only once around and cut at the seam.
14. Cut red construction paper into 4-1/2″ length and 3/4″, 1/2″ and 1/4″ strips. Repeat same rolling process to make a cherry.
Hang them up as fun summer party ornaments — how about some ice cream bunting?!
father’s day golf card
June 17, 2011 § 4 Comments
I was in the rough for a while. Finally mustered up the drive to get a grip, break out of my rut, get my head out of the sand, repair the chip off my shoulder, and here fore present you this last minute idea for Father’s Day. Yes. I’m back and unafraid to use a score of puns.
Here’s to the golfer dads in our lives — an accordion-folding, flag-raising, puntastic golf-themed greeting card — designed so you can tell him in a fair way:
DAD, you’re below par…
on the green
BUT, you’re above all else
You will need cardstock, bamboo skewers, double-sided tape, mounting tape/foam adhesive, and 1/4″ hole punch.
Without much fuss, you can very quickly design a card using none other than your word processor. I made simple arrows and chevrons to create a design, as well as diamond-shapes to create flags. It’s not apparent — I printed blue ink on light green cardstock and green ink on light blue cardstock. The front and back panels are 3-3/4″ x 9-1/2″, to perfectly fit a size-10 envelope. The inner green panel is scored such that there would be three 3-3/4″ squares, plus 1/2″ on each end for adhesive. Each “hole” is made of randomly-shaped green cardstock, punched with a hole.
Now let’s putt it all together:
1. Using double-sided tape, affix your front and back panels to the inner panel to form an accordion-folding card.
2. Using double-sided tape, affix one flag to the end of a bamboo skewer.
3. Trim the skewers in different heights, ensuring they are not longer than the length of the front and back panels of the card.
4. Take your “on” flag and feed the skewer through the hole and secure on the back with double-sided tape. Affix mounting tape.
5. Tape down the skewer and the hole on one panel of the green.
6. Continue with the “the” and “green” flags to complete your card.
There it is, a father’s day card, crafted to a tee. Now if I’ve missed other golfing lingo, please feel free to gimme!
Happy Father’s Day!
mehndi-inspired illustrated card
June 10, 2011 § 8 Comments
I’ll be heading to a henna party this evening for one of my friends who is a bride-to-be. In some Middle Eastern, East and West Indian cultures, it is customary for women to apply a decorative design with henna, called mehndi, on hands and feet before a wedding — a bridal shower of sorts. Last night, I decided to design this congratulatory greeting card for her, made in the likeness of mehndi.
 I had a lot of fun creating this design, which is composed almost entirely of hearts (fit for a bride-to-be) with some added swirls and lines to keep within the typical style of mehndi patterns. The flower and leaves are nothing but a repetition of hearts.
 All I used were: kraft card stock, light purple card stock, purple rhinestones, pencil, black felt pen, double sided tape, and 2″ circle punch.
 1. I made a 5″ x 7″ card, with a sleeve made of kraft cardstock. The folded sleeve has a final measurement of 6-1/2″. I made a 1/2″ allowance on two edges for double-sided tape. I punched the center of the edge of the sleeve where I want a design to peek through.
2. I cut a sheet of light purple card stock to a final size of 5″ x 7″, so that 1/2″ would peek through the sleeve. I doodled away with my pencil.
3. I went over my design with my black Sharpie felt pen.
4. I added the rhinestones for some sparkle.
5. I applied double-sided tape to the 1/2″ allowances I made and folded the sleeve shut.
I have never attended a henna party before. I am excited to see the designs the mehndi artist will create for my friend and her bridesmaids.
gold bean bangles
April 28, 2011 § 8 Comments
Yes, a few strips of paper, a small handful of beans, and the golden touch of paint can make quite some fashionista cuff bangles.
I was hoping this would be my third installment of my bean-by-number series (the first being the Turkish tiles back in November and the second, Venetian masks, for mardi gras in February). However, the concept is so simple, there is no need to bean-by-number. Just a few straight lines of beans do the trick.
You will need some beans, a sheet of cardstock, white glue, self-adhesive velcro (I got mine at the dollar store), and gold paint. PLEASE NOTE: I wore my gold bean bangles to work today and small parts of the paint have chipped off. If you are going to use spray paint, as I did, perhaps the problem would be negated by a bit of primer. Or, what I would best suggest: use acrylic paint and a paint brush instead. The finish would be quite different, however, the end result would look like brushed metal, which has as much impact.
1.. Cut cardboard to preferred width and length, taking into account the extra space required by the velcro. Adhere velcro.
2. Bean away. You don’t have to follow the straight patterns you see here. You can create all sorts of shapes and curves, which I’d like to try, too.
3. Paint one side. Let dry. Paint other side. Let dry.
I’d love to hear if you try this out and how you’ve managed to negate the issue of paint chipping.


