terracotta clay succulents
June 11, 2012 § 2 Comments
As soon as I posted the wedding invites and saw the overall concept through a computer screen (not on my desk as it had been evolving for weeks), I automatically felt the urge to perpetuate the evolution. The box shouldn’t be square, it should be an octagon. The concave corners should have a larger radius, to be accommodated by the octagon box. The green border shouldn’t be an invisible tint of honeydew, it should be a vibrant pistachio (a shade of green that would be noticeable through a camera lens!). The rounded variety of terracotta succulents should be used, not pointy (I made both types). It doesn’t end. It drives me mad.
The urge was more rampant over the weekend, with the further progression of our wedding crafting. I thought of another hundred different ways to make our invitations. But better. More unique. Last night, I asked O.T. for the umpteenth time “Do you like how our invitations turned out?”. His reply: “Well, it’s classic.” What I hear is: boring, predictable, ordinary, aren’t you capable of more creativity? For someone who used to own a company called out-of-the-box ideas and make invitations as contemporary as this fairytale castle, our own invitation design is perhaps not anything anyone expected of me, not even myself. Suddenly, as though out-of-body, I want to shake myself for not going out-of-the-box.
I’d like to believe when I went to the drawing board after booking the wedding a month ago, that I had a purpose (and very little time). The terracotta succulents were intended for the invitations, yes. But they were ultimately designed for the bouquet, which I have since made and love far more than the invites.
I used self-hardening terracotta clay. Not just “air dry” — that stuff crumbles (I tried and failed miserably). Heart shape cookie cutters. Rolling pin. Garbage bag. Paper floral stems.
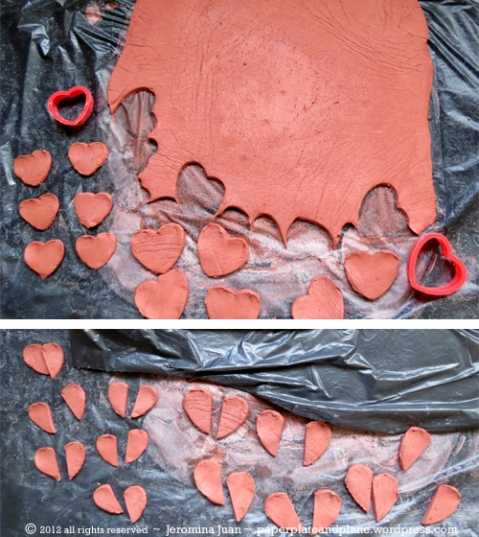
To start, I rolled the clay between a folded sheet of garbage bag to a thickness of 1/8″. I allowed the garbage bag to wrinkle, which left a leather-like texture on the surface of the clay. Then I cut a number of heart shapes using two sizes of cookie cutter. I further split the hearts into two halves.
For the invites, the terracotta succulents are pointy and flat-bottomed. I placed halves of the larger hearts to form a 6-pointed star shape and placed a second layer, with halves alternating to cover gaps. I continued by placing halves of the smaller hearts in the same manner until it reached a full bloom. I guess “bloom” is not exactly the word. Succulents have leaves, not petals. I pinched each leaf to create a point. Then I set it all aside to harden.
For stemmed terracotta succulents, I started from the inside out by pinching three small halves around the tip of a paper floral stem. I pinched additional layers, with halves alternating to cover gaps. I used three layers of small halves and proceeded with another three layers of large halves. I made two varieties using the same heart halves — pointy side up and rounded side up.
For the bouquet, I have a combination of terracotta and artificial succulents. Realistically, there won’t be any time to prowl around Vegas nurseries for fresh succulents the day before the wedding, so we purchased artificial succulents and cacti at qualitysilkplants.com with a $100 splurge. Real succulents and cacti would’ve cost us far less. However, given the time-frame, this was most efficient. My bouquet is made well ahead of time and I can’t wait to show you. Let’s hope the terracotta survives the trip in my carry-on!
suede-boxed invites with hand-marbled papers and terracotta succulents
June 4, 2012 § 5 Comments
I didn’t think this would be so hard! Especially after designing handmade stationery for over 150 weddings in my designer days. I discovered, amidst the arduous task of making my own invitations, that it is a million times easier to design for someone else!
The problem was I wanted to design in every style possible. In one brainstorm, I’d want classic and sophisticated. The next, I’d want graphic and whimsical. Then after more thought, I’d want minimal. It was a harrowing process to narrow down to one decision only. I’m not used to this! Clients did all this decision-making for me! But for our own invitations, I felt like I could’ve made a hundred different versions to satisfy my fickle fancies.
It was a challenge to clear my mind of all the invitations I’ve made in the past. One thing is for sure: wedding invitations are about tactility. The product is entirely about texture and touch. So how could I make something classic, sophisticated, graphic, whimsical, and minimalist at the same time? Well, I tried. Really tried. And it hit me: all of my fickle fancies could be relevant and cohesive.
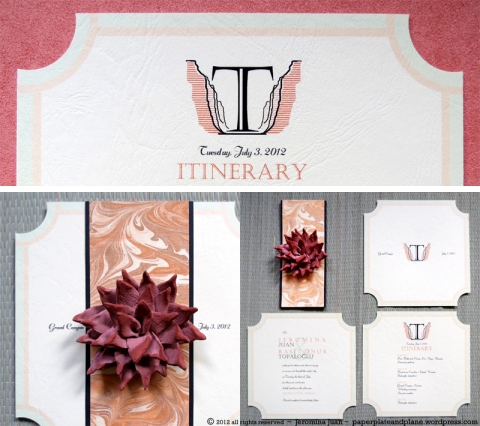
For a classic style: a square shape with concave corners. The invites are printed on my favorite stock of all time — leather-textured paper, which reminds me of old books.
For an air of sophistication, the inserts are carried in a handmade micro-suede box (color blocked in apricot and camel), with personalized dust sleeve made of the same leather-textured paper used for the inserts.
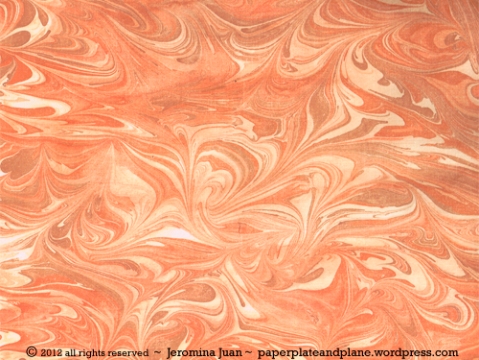
For something bold and graphic, I knew ebru, the Turkish art of paper marbling, would be relevant by today’s trends and significant by O.T.’s culture (apart from conveniently resembling the Grand Canyon walls). He was really impressed that I went so far as to learn how to make my own marbled papers. He would like to take credit as supervisor of this process.
For a bit of whimsy, I sculpted succulents out of terracotta clay to complement our earthy desert venue. I mentioned in a previous post that terracotta will have a significant part at our wedding and the invites provide this sneak peek.
For the minimalist architect grad in me: a monogram of our future family initial with a simplified and very architectural hatched illustration of the Grand Canyon. O.T. and I heavily considered helicopter silhouettes, but later decided the oversize “T” emulated helicopter rotors reaching to the bottom of the canyon, in a very implicit way.
This whole project was an ordeal, more time consuming than I expected.
The boxes took the longest time to make. I cut and glued millboard before covering the surface with the micro-suede material I showed in my previous post, and affixed a monogrammed transparency as a window.
The terracotta succulents took a long time to dry (3 weeks) and they still don’t look entirely dry, but I am quite liking the darkened tips. I will post a tutorial on how I made the terracotta succulents next.
The ebru marbled papers were the quickest to make (without considering the hours upon hours of researching how ebru is done). I was at odds about the marbled papers for two reasons. They can be bought online, but it was really important for me to make our own in the colors and patterns that unify the project. The materials to make ebru are pricey, so there was a point where making ebru was difficult to justify.
I found sites recommending shaving cream. I tried. What an awfully imprecise way to make marbled paper! Then there are sites which recommend methyl cellulose (very pricey considering I could only find it online and shipping fees to Canada are enormous). But I wasn’t going to give up.
I happened upon this amazing blog, Knit One Quilt Too, on easy paper marbling using liquid starch. It was decided. I will embark on the adventures of my own hand-marbled papers. And for super cheap! Sta Flo Liquid Starch sells for $2.97 at Walmart!
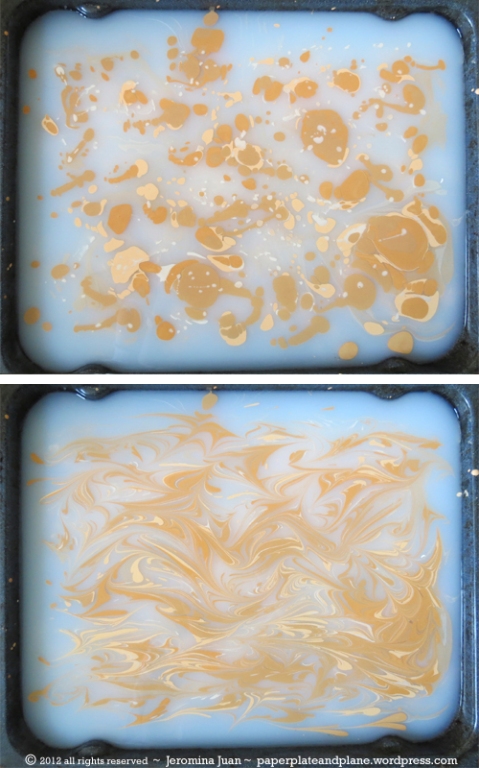
It was a painless process. I placed half a jug of liquid starch in a shallow tray. Then I gently drizzled watered-down acrylics on the surface of the starch. And marbled away using a bamboo skewer. I carefully dipped my paper on the surface of the marbled starch and immersed it in a water bath for a few seconds to rinse the starch, then laid the paper flat to dry. I was impressed with the level of control the liquid starch provided and couldn’t be happier with my first paper marbling experience.
Insane, these invitations made me. And I only had to make four! I have never put so much thought and time into invitations for anyone else, nor will I ever. I am pretty happy with the results!


